Why Generic Music Playback is Ineffective for Audio Testing
Most smartphone users test their speakers by simply playing a pop song on Spotify or YouTube. However, modern commercial music is heavily compressed, multi-layered, and spans dozens of shifting frequencies simultaneously. When a song plays, psychoacoustic masking conceals subtle voice coil scraping, harmonic distortion, or single-frequency mechanical buzzing.
True audio engineers evaluate micro-speakers using pure sine sweeps, discrete reference frequencies, and isolated channel routing. By testing specific acoustic bands in isolation, you can identify whether an issue is caused by physical dust buildup, trapped water droplets, blown coil suspension, or a simple software audio balance glitch.
The 5 Empirical Diagnostic Methods
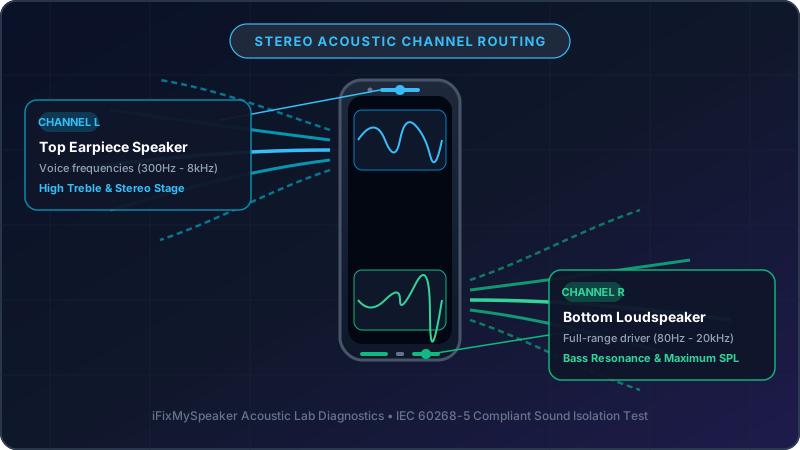
1 Stereo Channel Isolation & Separation Test
Nearly all modern smartphones (Apple iPhone, Samsung Galaxy, Google Pixel, Xiaomi, OnePlus) utilize a dual-speaker stereo configuration:
- Earpiece Speaker (Top bezel): Primarily tuned for high-mid and treble frequencies (800Hz to 12,000Hz) to maximize voice clarity during calls.
- Main Loudspeaker (Bottom port): Designed with a larger acoustic resonant cavity for low-end bass and mid-range fullness (120Hz to 4,000Hz).
To determine if only one transducer is damaged, navigate to our Online Speaker Sound Test and run the Stereo Panning Test. Listen to the Left channel alone, then the Right channel alone. If the bottom speaker is crystal clear but the top earpiece crackles, you have isolated the defect to the earpiece acoustic mesh.
2 Dynamic Full-Spectrum Frequency Sweep (20Hz to 20,000Hz)
A continuous sine sweep smoothly ascends through the entire spectrum of human hearing. As the pitch rises, observe closely for specific audio artifacts:
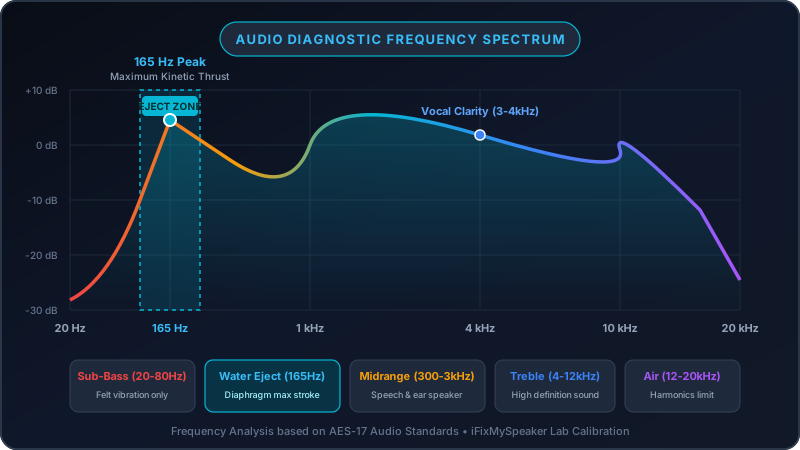
- 60Hz – 250Hz (Bass Band): Heavy physical diaphragm excursion occurs here. If you hear a loud buzzing or vibrating rattle at low frequencies, there is likely loose lint, dried water residue, or a dislodged speaker gasket vibrating against the chassis.
- 1,000Hz – 3,000Hz (Mid-range Speech): If vocal tones sound harsh, muffled, or distorted, water may still be trapped across the acoustic damping mesh.
- 8,000Hz – 15,000Hz (High Treble): If high-frequency chimes are completely absent, the micro-tweeter voice coil wire may have suffered a thermal open-circuit burn.
You can run a calibrated frequency sweep directly on our Speaker Sound Test Tool or test specific frequencies on the Tone Generator.
Test Your Speaker in Real Time
Run our interactive Web Audio stereo channel test and frequency sweep directly in your mobile browser. Zero install required.
Launch Speaker Sound Test →3 Discrete Reference Frequency Check
Testing individual pure sine waves isolates acoustic anomalies at exact calibration points:
- 165Hz Pulse: Tests maximum cone excursion. If the phone was wet, run this tone on our Water Eject Cleaner to dislodge liquid droplets.
- 440Hz (Concert Pitch A): Tests pure fundamental tone generation without harmonic distortion.
- 1,000Hz (Acoustic Reference Standard): The international benchmark for speech intelligibility and volume calibration.
- 2,500Hz: Highlights ear speaker resonance and checks for high-frequency squeal.
4 Built-In Hardware Diagnostic Codes (Secret Menus)
Android manufacturers build secret engineering test suites into device firmware that bypass the operating system's software EQ and Dolby Atmos processing:
- Samsung Galaxy: Open the Phone dialer and type
*#0*#. Tap the Speaker button. The phone will play a loud dual-channel audio test. Tap again to test individual transducers. - Xiaomi / Redmi: Dial
*#*#6484#*#*to access the CIT (Customer Integration Test) menu. Select "Speaker Test" to run automated hardware diagnostics. - Google Pixel: Open the Phone app and dial
*#*#7287#*#*or use Android 14+ Settings > System > Diagnostics. - Apple iPhone: Apple does not provide a public dialer code, but you can check Settings > Accessibility > Audio & Visual > Balance slider to ensure audio is not unintentionally panned to one ear.
5 Visual Inspection with Magnification & Lighting
Before assuming internal hardware failure, use a high-powered flashlight and smartphone camera zoom or a 10x magnifying glass to inspect the exterior speaker grille openings. Over 60% of "low volume" complaints stem from packed pocket lint, makeup residue, dead skin cells, or earwax forming an opaque barrier over the acoustic mesh pores.
If you see physical debris, read our guide on How to Clean iPhone Speaker Grilles or How to Clean Android Speakers to safely remove the debris without piercing the mesh.
Speaker Diagnostic Troubleshooting Matrix
| Observed Symptom | Probable Root Cause | Recommended Action |
|---|---|---|
| Muffled, underwater sound; quiet volume | Trapped liquid droplets bridging the acoustic mesh pores | Run 165Hz Water Eject Sound for 3 cycles with speaker angled downward. |
| Rattling / Buzzing at low bass frequencies | Loose lint or debris trapped against the moving cone | Run Deep Clean Sweep to vibrate dry particles loose, then brush gently. |
| Harsh crackling / Static at high volumes | Deformed voice coil rubbing against the neodymium magnet | Voice coil mechanical damage; requires speaker module replacement. |
| Only earpiece works; bottom speaker completely silent | Blown amplifier channel, software audio balance shift, or physical coil fracture | Verify Accessibility balance settings; if balance is centered, seek hardware repair. |
| Hissing or humming when no audio plays | Ground loop or audio DAC pre-amp component failure | Perform a full device restart; test in Safe Mode to rule out third-party app bugs. |
Next Steps After Diagnostic Testing
If your diagnostics indicate trapped moisture, immediately run our Free Fix My Speaker Cleaner. If testing revealed dry dust or lint buildup, proceed to our Deep Clean Audio Utility. For further guidance on maintaining acoustic integrity, visit our Frequently Asked Questions.